How to import Celia Contract Address (CA) in Trust Wallet
If you’ve mined Celia tokens and are preparing for the token distribution between December 2nd and 3rd, here’s a step-by-step guide to safely add the Celia contract address to Trust Wallet.
Step 1: Access the Token Management Menu
Click on the two interlocking circles at the top-right corner of your Trust Wallet interface. This icon allows you to manage your token list.
Step 2: Add a New Custom Token
At the same top-right corner, click on the plus (+) icon. This will take you to the page for adding a custom token.
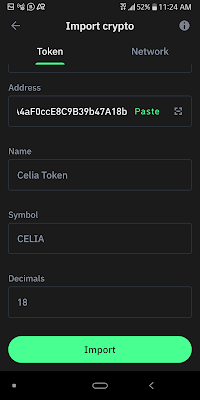
Step 3: Configure the Token Details Carefully
This is the most critical step! If you make an error here, you could lose your Celia tokens. Please follow these instructions carefully:
- Set the network type to "BNB Smart Chain" because Celia is launching on the Binance Smart Chain.
- Paste the Celia contract address in the "Address" section:
0x073761656dC0654F729A4aF0ccE8C9B39b47A18b
Once you paste the contract address, the following fields will automatically populate:
- Name: Celia Token
- Symbol: Celia
- Decimal: 18
Finally, click "Import" to confirm the process.
Step 4: Verify the Added Token
After successfully importing the token, scroll down on your Trust Wallet home page. You will now see the Celia logo listed among your assets. Once the token distribution is complete, you can click on the Celia token to view your allocation.
Important Advice
- Don’t rush the process: Ensure every detail, especially the contract address, is entered correctly.
- Double-check the contract address: Verify that you’ve pasted the correct address:
0x073761656dC0654F729A4aF0ccE8C9B39b47A18b
By following these steps, you can safely add the Celia contract address to Trust Wallet and prepare for the upcoming token distribution.


Is Celia still available for training
ReplyDelete